If you’re craving a frothy coffee drink but don’t have an espresso machine, don’t worry! There are plenty of ways to froth milk at home using simple tools you probably already have. Whether it’s a jar, a whisk, or even a microwave, you can create that creamy texture you love without any fancy equipment. Let’s explore various methods to froth milk without an espresso machine so you can enjoy your favorite beverages right at home.
Key Takeaways
- You can froth milk using a jar by shaking it vigorously before microwaving.
- A whisk can create great foam if you heat the milk properly first.
- Non-dairy milks like oat milk work well for frothing too.
- Using a French press can yield nice, airy foam for your drinks.
- Always heat your milk before frothing for the best results.
Techniques For Frothing Milk Without Equipment
So, you want that coffee shop experience at home but don’t have a fancy espresso machine? No problem! There are several milk frothing techniques you can use to get that perfect, creamy foam without any special equipment. It might take a little elbow grease, but the results are totally worth it.
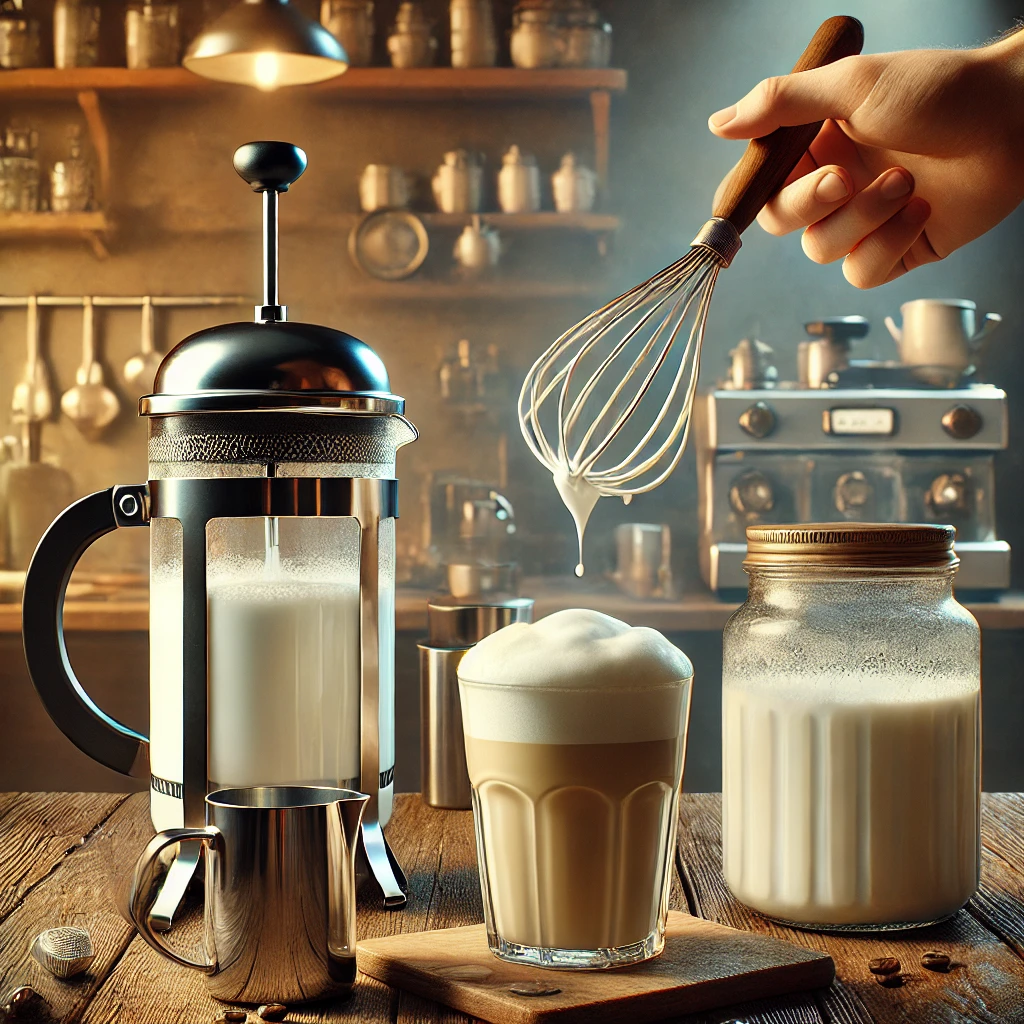
Using A Jar
This is probably the easiest method out there. All you need is a jar with a lid!
- Heat your milk in the microwave or on the stovetop. You want it warm, but not boiling.
- Pour the milk into the jar, filling it about halfway. This gives the milk room to expand when you shake it.
- Secure the lid tightly and shake the jar vigorously for 30-60 seconds. You’ll see the milk start to foam up.
- Remove the lid and pour the frothed milk into your coffee. Boom! Instant latte.
Whisking By Hand
If you’re looking for a bit of a workout while making your coffee, whisking is the way to go. It’s one of the most common manual milk frothing methods.
- Heat your milk like before.
- Pour the warm milk into a bowl.
- Whisk vigorously until you get the desired amount of foam. This can take a few minutes, so be patient.
- Pour the frothed milk over your coffee and enjoy.
French Press Method
Did you know your French press isn’t just for coffee? It’s also a surprisingly effective milk frother! This is a great way to learn how to foam milk at home.
- Heat your milk.
- Pour the warm milk into the French press.
- Pump the plunger up and down until the milk is foamy. This usually only takes about 30 seconds.
- Pour and enjoy!
These methods are great because they don’t require any special equipment. You probably already have everything you need in your kitchen. Experiment with different types of milk to see what works best for you. Remember, practice makes perfect, so don’t get discouraged if your first attempt isn’t perfect. Keep at it, and you’ll be a milk-frothing pro in no time!
Choosing The Right Milk For Frothing
Choosing the right milk can really make or break your frothing game. It’s not just about what you have in the fridge; it’s about understanding how different types of milk behave when you try to whip them into a cloud of foam. Some milks froth like a dream, while others… well, not so much. Let’s explore the best options to get that perfect, cafe-worthy froth at home.
Best Types Of Milk
Whole milk is often considered the gold standard for frothing, thanks to its high fat content. That fat helps create a stable, rich foam that holds its shape well. But don’t count out other options! Reduced-fat (2%) milk can also work surprisingly well, sometimes even better than whole milk because it’s often fortified with extra protein, which aids in frothing. Skim milk will give you a lot of volume, but the foam will be a bit thin and disappear quickly. Ultimately, it comes down to personal preference and what kind of texture you’re after. Experiment and see what you like best!
Non-Dairy Alternatives
If you’re dairy-free, don’t worry, you can still get your froth on! Oat milk is a fantastic option, known for its creamy texture and ability to create a stable foam. Oat milk is highly favored by baristas for its dairy-like taste. Soy milk is another popular choice, though it can sometimes have a slightly beany flavor. Almond milk can be a bit trickier, as it tends to produce a thinner foam, but some brands are specifically formulated for frothing. Coconut milk (the kind in the carton, not the canned stuff) can also work, but it will impart a coconut flavor to your drink. Again, it’s all about experimenting to find what works best for you and your taste buds.
Milk Temperature Considerations
Temperature is key when it comes to frothing milk. You want your milk to be warm, but not scalding. Aim for a temperature between 140-155°F (60-68°C). If the milk is too cold, it won’t froth properly. If it’s too hot, you risk scalding it, which will ruin the flavor and make it difficult to froth. Use a thermometer to be precise, or just heat it until it’s steaming but not boiling. Remember, the goal is to create a sweet, stable foam, and temperature plays a big role in achieving that.
Getting the temperature right is super important. Too cold, and you’ll get sad, flat milk. Too hot, and you’ll end up with a burnt taste that no amount of sugar can fix. Trust me, I’ve been there. A good thermometer is your best friend in this process.
Creating Froth With A Microwave
Microwaving milk to create froth might sound odd, but it’s surprisingly effective! It’s a quick and easy way to get that foamy texture without any fancy equipment. Let’s explore how to do it.
Heating Milk Properly
First things first, you need to heat the milk. The goal isn’t to boil it, but to get it nice and warm – around 150°F (65°C) is ideal. You can use a microwave-safe container. Start with about 30-second intervals, checking the temperature each time. Overheating can lead to scalding, which you definitely want to avoid. Nobody wants burnt milk in their latte!
Using A Jar Method
This is where the magic happens. Pour the warm milk into a jar – a mason jar works great. Make sure it’s only filled about halfway; you need room for the foam to expand. Now, seal the jar tightly and shake it like you’re trying to win a prize! Shake vigorously for about 30 to 60 seconds. You’ll notice the milk increasing in volume as it becomes frothy. This method is similar to using immersion blender for frothing.
Setting The Foam
After shaking, remove the lid from the jar and microwave the milk for another 30 seconds. This helps to stabilize the foam. Keep a close eye on it, as it can overflow. The microwave energy helps to set the foam, giving it a more stable structure. Once done, you’ll have a lovely layer of froth ready to top your coffee or hot chocolate. You can use this technique to make homemade latte.
Using the microwave is a great way to get frothed milk quickly. It’s not quite the same as a professional espresso machine, but it’s a solid alternative for a quick and easy at-home latte.
Here’s a quick guide:
- Heat milk to 150°F.
- Pour into a jar (halfway).
- Shake for 30-60 seconds.
- Microwave (lid off) for 30 seconds.
Frothing Milk On The Stovetop
Heating Milk Evenly
Okay, so you want to froth milk on the stovetop? It’s totally doable, and honestly, it’s how I started before I got any fancy equipment. The key thing here is even heating. You don’t want to scorch the milk, because that’ll ruin the taste and the frothing process. I usually use a stainless steel saucepan because it distributes heat pretty well. Keep the heat on medium-low, and watch it like a hawk. Seriously, don’t walk away!
Whisking Techniques
Now, for the fun part: whisking! This is where you’ll actually create the froth. Once the milk is heated (around 150°F is ideal – you want it hot, but not boiling), take it off the heat. Then, grab your whisk and get ready to put in some elbow grease. You want to whisk vigorously, moving the whisk back and forth and up and down. The goal is to incorporate air into the milk, which creates those lovely little bubbles. Keep whisking for a minute or two, or until you get the amount of froth you want. It takes a little practice, but you’ll get the hang of it.
Pouring Over Coffee
Alright, you’ve got your frothed milk. Now what? Time to pour it over your coffee! The trick here is to pour slowly and deliberately. Hold back the foam with a spoon as you pour the warm milk into your coffee. Then, once you’ve poured the milk, use the spoon to scoop the foam on top. This gives you that nice layered effect you see in fancy coffee shops. And there you have it – stovetop-frothed milk, ready to elevate your coffee game!
I remember the first time I tried this, I totally scorched the milk. The smell was awful, and the milk was unusable. Lesson learned: low and slow is the way to go. Now, I can froth milk on the stovetop like a pro, and it’s a great way to impress your friends (or just yourself) with a fancy homemade latte.
Exploring Alternative Frothing Tools

Okay, so you’re not into the jar thing, or maybe you’re tired of whisking until your arm feels like it’s going to fall off. No problem! There are other ways to get that lovely frothed milk without an espresso machine. Let’s explore some alternative tools that can make your life easier.
Using A Handheld Frother
These little gadgets are super convenient. A handheld frother is basically a tiny whisk on a stick that’s battery-powered. You just stick it in your milk and let it do its thing. They’re easy to clean and don’t take up much space, which is a win in my book. Plus, they’re pretty affordable. I got mine for around $15, and it’s been going strong for months.
Employing A Blender
Believe it or not, your blender can actually froth milk! It’s not quite as precise as some other methods, but it works in a pinch. Here’s how:
- Heat your milk in the microwave or on the stovetop until it’s warm but not boiling.
- Pour the milk into your blender.
- Blend on high speed for about 30-60 seconds, or until the milk is frothy.
Just be careful when you pour the frothed milk out of the blender, as it can be a bit messy. Also, this method tends to produce larger bubbles, so it’s not ideal for latte art.
Utilizing A French Press
I’m a big fan of using a French press for frothing milk. It’s a multi-purpose tool, which I always appreciate. Plus, I think it makes really good foam. Here’s the deal:
- Warm your milk (again, not boiling!).
- Pour the warm milk into your French press. Don’t fill it up too much, leave some room for the foam to expand.
- Put the lid on and pump the plunger up and down vigorously for about 30-60 seconds. You’ll see the milk transform into a lovely, thick foam.
The French press method is my personal favorite because it gives you a good amount of control over the foam, and the spout makes pouring easier. It’s also great if you already have a French press for making coffee!
Delicious Drinks To Make With Frothed Milk
Okay, so you’ve mastered the art of frothing milk without fancy equipment. Now what? Time to put that skill to good use! Frothed milk isn’t just for show; it can seriously transform your everyday drinks into something special. Let’s explore some delicious options.
Lattes And Cappuccinos
Let’s start with the classics. A latte is basically espresso with steamed milk and a thin layer of foam, while a cappuccino features equal parts espresso, steamed milk, and foamed milk. The key difference is the ratio of milk to foam. For a latte, you’ll want a smoother, more integrated milk texture, whereas a cappuccino thrives on that thick, airy foam. Don’t be afraid to experiment with different flavored syrups or spices like cinnamon or nutmeg to customize your drinks. You can even try a London Fog tea latte for a twist.
Hot Chocolate Variations
Who says hot chocolate has to be boring? Adding frothed milk takes it to a whole new level of indulgence. Instead of just stirring in some milk, top your hot chocolate with a generous layer of frothed milk. For an extra touch, sprinkle some cocoa powder or chocolate shavings on top. You can also experiment with different types of chocolate, like dark, milk, or white chocolate, to create unique flavor combinations. Consider adding a dash of peppermint extract for a festive twist, or a pinch of chili powder for a spicy kick.
Iced Coffee Creations
Frothed milk isn’t just for hot drinks! It can also elevate your iced coffee game. Cold foam, made with frothed cold milk, is the perfect topping for iced lattes, cold brews, or even just plain iced coffee. The cold foam adds a creamy, luxurious texture without diluting your drink like ice cream would. You can even flavor your cold foam with syrups or spices to complement your coffee. For example, a vanilla cold foam on top of a caramel iced latte is a match made in heaven.
I’ve found that using a touch of sweetener in the milk before frothing it for iced coffee makes the foam extra delicious. It’s a small change, but it really enhances the overall flavor and texture of the drink. Plus, it looks super fancy when you pour it over the top!
Tips For Perfecting Your Frothing Technique
Avoiding Scalding Milk
Okay, so you’re trying to get that perfect froth, but burning the milk? Total buzzkill. The key is to watch the temperature closely. I usually aim for around 140-155°F (60-68°C). If you don’t have a thermometer, just heat the milk until you see steam rising and small bubbles forming around the edge of the pan. Pull it off the heat before it starts to boil. Burnt milk tastes gross and won’t froth well, trust me.
Achieving Desired Foam Consistency
Getting the right foam is all about technique and a little bit of luck. Here’s what I’ve learned:
- For a thick, stiff foam (like for a cappuccino), you need to incorporate a lot of air. Shake that jar like you mean it, or whisk like your arm is about to fall off.
- For a smoother, more velvety foam (like for a latte), be a bit gentler. Focus on creating small, even bubbles.
- Tap the container on the counter after frothing to get rid of big bubbles, then swirl the milk to even it out. It makes a difference!
Using Fresh Ingredients
This might sound obvious, but using fresh milk makes a huge difference. Milk that’s about to expire just doesn’t froth as well. Also, make sure your equipment is clean. Residue from old milk can mess with the foam. I always give my jars and whisks a good scrub before I start. It’s a small thing, but it helps.
Honestly, frothing milk without fancy equipment is a bit of an art. Don’t get discouraged if it doesn’t come out perfect the first few times. Keep practicing, and you’ll get the hang of it. And even if the foam isn’t Instagram-worthy, it’ll still taste great in your coffee!
Wrapping It Up
So there you have it! Frothing milk at home without an espresso machine is totally doable and can be a fun little project. Whether you choose to shake it up in a jar, whisk it by hand, or use a French press, you can create that creamy foam that makes your coffee feel special. It’s all about finding what works best for you and your kitchen setup. Plus, you get to enjoy your favorite drinks just the way you like them, all from the comfort of your home. So grab your milk, pick a method, and start frothing! Your coffee will thank you.
Frequently Asked Questions
What is the easiest way to froth milk without a machine?
The simplest method is to use a jar. Fill it halfway with milk, seal it tightly, and shake it for about 30 seconds until it gets frothy. Then, microwave it for 30 seconds to set the foam.
Can I froth non-dairy milk?
Yes! Non-dairy milks like oat milk or almond milk can be frothed, but they may not froth as well as regular milk. Oat milk is usually the best choice for frothing.
What type of milk works best for frothing?
2% milk or skim milk froth better than whole milk because they have more protein, which helps create foam. However, you can use any milk you like!
How hot should the milk be for frothing?
Milk should be heated to about 140 to 155 degrees Fahrenheit before frothing. If it gets too hot, it can scald and ruin the flavor.
Can I froth milk in a microwave?
Yes, you can froth milk in a microwave. Heat the milk first, then use a jar or whisk to create foam. Just be careful not to overheat it!
What drinks can I make with frothed milk?
You can use frothed milk to make lattes, cappuccinos, hot chocolate, and even iced coffee drinks. It adds a creamy texture and delicious flavor!